Wednesday, November 5, 2008

Haskell for C# Programmers Part 2: Understanding IO

One of the most difficult things for C# developers to understand about Haskell is the way in which it performs stateful tasks such as IO. In part 1 I explained the difference between methods and pure functions. Pure functions always return the same value if passed the same arguments and don't change the state of the system. C# methods that change state (ex. change a global variable, return a pseudo-random number, write to disk) are considered "impure." In C# we can create both pure functions and methods. In Haskell it is only possible to create pure functions. This might seem strange. After all without impure operations you can't even generate a random number. That would make for a pretty dull poker game eh?

"Who cares about purity?"

Impure programs are a lot like machines with moving parts. Every time you look at them they are in a different state. In contrast pure programs are like machines with no moving parts. They are, on close inspection, just formulas executed by the computer. Want to take a guess which machine is more reliable?

In addition to the benefits of clarity and increased reliability it turns out that compilers can also make certain types of optimizations if they can be sure that code is pure. That's one of the reasons Haskell can be very fast despite the fact that it is such a high-level language.

"That's all well and good but I need to change state!"

Indeed you do. We don't want to get rid of state (we can't) but we DO want to separate the pure operations from the impure ones. Haskell allows you to perform impure actions, but it forces you to bundle them up together and execute them at the end of your program. Conceptually a Haskell program is a pure function that creates an impure program and runs it.

"Weird."

Not at all. It's very similar to what C# developers are now used to doing with Linq all the time. Take the following program:

var evenNumbers = from x in Enumerable.Range(0,100) where x % 2 == 0 select x*x;

What is the value of evenNumbers? It isn't a bunch of computed numbers stored in memory. It's a sequence which, when traversed, will generate those numbers. The Range function returns a sequence. This sequence is wrapped inside of another sequence by the Where function. Finally that sequence is wrapped inside of another sequence by the Select function. Only when we traverse the Sequence do the functions in the Select and Where sequences actually execute.

foreach (var num in evenNumbers) { System.Console.WriteLine("{0}", num); }

Linq allows us to combine a bunch of sequence operations together and then run them later. Imagine if we could use Linq to combine a bunch of stateful operations (ex. IO, random number generation) together then run them later. Surprisingly we can.

"I thought this post was about Haskell."

It is. Bear with me. Let's write some C# code that reads a url from the console, downloads the HTML, and then writes it to the console. However instead of doing things the typical C# way we'll do things the Haskell way. Let's start by defining a type called IO.

public delegate T IO<T>();

Our IO type is similar to IEnumerable. When it's run it will perform an operation and return the resulting value.  An IEnumerable is run with GetEnumerator and an IO is run by, well, running it.  The principle difference between the two are that a traversing a sequence doesn't necessarily have side-effects while running an IO function does.  Also an IO returns only one value while sequences return many.

Let's define a function that reads a string from the console. Since this function changes state it will return IO<string> instead of string. By returning a function that does the work instead of just doing it right away we can delay this operation and group it with others.

// Returns a function which, when executed // will get an address from the console // and return it. static IO<string> GetAddressFromConsole() { return () => Console.ReadLine(); }

Pretty straightforward right? Notice how easy this is thanks to C#'s lambda expressions and type inference. Now we'll write a method that retrieves the HTML for a given address.

static IO<string> GetHtml(string url) { return () => { string html = null; using (WebClient client = new WebClient()) { html = client.DownloadString(url); } return html; }; }

Once gain retrieving information from the internet involves IO so we again wrap the work in an IO function in order to delay its execution. The last basic function we need to create is one that writes a string to the console:

static IO<object> WriteToConsole(string value) { return () => { System.Console.WriteLine(value); // We have to return a value so we just return null return null; }; }

Notice that all of these functions are pure! They don't do work, they create functions that do work when they are called. That's how Haskell keeps its hands clean. Now that we've built our basic functions we're ready to write our program.

static IO<object> RealMain(string[] args) { return from address in GetAddressFromConsole() from html in GetHtml(address) from _ in WriteToConsole(html) select _; }

This function will retrieve a URI from the console, retrieve the HTML for that URI, write it to the console, and return null because the last operation, writing to the console, has no return value. Notice that our Main function is an IO function as well! This Linq usage may appear strange to you.  I had to write some code so that Linq knew how to compose our IO objects together but I'll explain that later.

"OK now what?  When do we actually do something?"

Now that we've composed all of these functions together into one IO function it's just a matter of running it. 

// This function is generated by Haskell automatically static int Main(string[] args) { var IO = RealMain(args); try { IO(); // IO operations are lazily executed in sequence return 0; } catch (Exception) { return -1; } }

"Hold on.  I thought you said that Haskell couldn't perform impure operations."

I lied. It does exactly ONE impure operation.  Once all your impure operations are bundled together into one IO function that function is run.  The only difference is that Haskell automatically generates the code above.  It is implicit. Now without further ado let's look at the Haskell equivalent of the code above.  Hopefully it will be much easier to understand now.

let GetHtml :: string -> IO string GetHtml = --This definition is not relevant now let GetAddressFromConsole = getLine --this is a built-in function that reads from the console let WriteToConsole = putStr --this is a built-in Haskell function that writes to the console main :: IO () main = do address <- GetAddressFromConsole () html <- GetHtml(address) WriteToConsole html

Monads

Now that you understand that Haskell handles IO the same way C# handles sequence operations you may have started to wonder what other types of operations can be composed in this manner. Both IO object and IEnumerable are examples of Monads and there's nothing scary about them other than the name.  Monads are the important idiom to understand if you want to write Haskell programs. Next time I'll explain how they work and how I managed to use Linq to sequence our IO monad.

Monday, November 3, 2008

Using ImplicitStyleManager and Theme Containers

No doubt many of the developers and designers who are exploring Silverlight have had some exposure to WPF.  As a result they may be used to relying on implicit styles to ensure their application's have a uniform look and feel.  WPF's implicit styling behavior ensures that styles in the resources of an element are applied to their logical descendents.  Take the following WPF XAML snippet for example:

<StackPanel> <Border> <Border.Resources> <Style TargetType=“{x:Type Button}"> <Setter Property="Foreground" Value="Green" /> </Style> <Style TargetType=“{x:Type TextBlock}"> <Setter Property="Foreground" Value="Green" /> </Style> </Border.Resources> <StackPanel> <Button Content="Button inside border" /> <TextBlock>TextBlock inside border</TextBlock> </StackPanel> </Border> <Button Content="Button outside border" /> </StackPanel>

When the following markup is rendered the Button and the TextBlock inside the border will have inherited the applicable styles in the border's resource dictionary while the button outside of the border will remain unstyled.

wpfexample

This behavior is handy indeed.  It allows designers to use a mechanism similar to lexical scope to style their applications and eliminates the need to apply a style to several controls of a particular type.  That's WPF, but what about Silverlight? 

The Bad News

We can translate the XAML above to Silverlight quite easily:

<StackPanel> <Border> <Border.Resources> <Style TargetType=“Button"> <Setter Property="Foreground" Value="Green" /> </Style> <Style TargetType=“TextBlock"> <Setter Property="Foreground" Value="Green" /> </Style> </Border.Resources> <StackPanel> <Button Content="Button inside border" /> <TextBlock>TextBlock inside border</TextBlock> </StackPanel> </Border> <Button Content="Button outside border" /> </StackPanel>

The only thing we've done here is remove the {x:Type} markup extension which isn't supported in Silverlight 2.  There's one little problem though: the Button and TextBlock don't get styled.  Since Silverlight 2 does not support implicit styles you have to manually apply them like so:

<StackPanel> <Border> <Border.Resources> <Style x:Key="myButtonStyle" TargetType=“Button"> <Setter Property="Foreground" Value="Green" /> </Style> <Style x:Key="myTextBlockStyle" TargetType=“TextBlock"> <Setter Property="Foreground" Value="Green" /> </Style> </Border.Resources> <StackPanel> <Button Style="{StaticResource myButtonStyle}" Content="Button inside border" /> <TextBlock Style="{StaticResource myTextBlockStyle}">TextBlock inside border</TextBlock> </StackPanel> </Border> <Button Content="Button outside border" /> </StackPanel>

That's not so bad right?  Of course what if you have a form with 50 controls?  It's gets to be a drag explicitly applying style to each and every control.  No doubt you have better things to do with your time.  If you live in the US you could vote in Tuesday's election.  Or whatever.  I'm just saying.

The Good News

We on the Silverlight toolkit team have a created a control that brings WPF-like implicit styling to Silverlight 2.  The control's name is ImplicitStyleManager (ISM) and it allows implicit styling to be applied to a control by defining the attached "ApplyMode" property.

<StackPanel> <Border controls:ImplicitStyleManager.ApplyMode=“OneTime"> <Border.Resources> <Style TargetType="Button"> <Setter Property="Foreground" Value="Green" /> </Style> <Style TargetType="TextBlock"> <Setter Property="Foreground" Value="Green" /> </Style> </Border.Resources> <StackPanel> <Button Content="Button inside border" /> <TextBlock>TextBlock inside border</TextBlock> </StackPanel> </Border> <Button Content="Button outside border" /> </StackPanel>

If we run this we get the expected result:

wpfexample

There are three possible values for ApplyMode:

  1. None (default)
  2. OneTime
  3. Auto

Setting ApplyMode to None is equivalent to not setting the property at all.  Setting ApplyMode to OneTime will cause styles to be applied once after the templates are applied while setting ApplyMode to Auto will ensure that any controls dynamically added to an implicitly styled container will also be styled.

Using External Resource Dictionaries

WPF allows designers and developers to use the styles defined in an external resource dictionary instead of the styles defined in element's local resources.  This can be accomplished with the following XAML:

<StackPanel> <Border> <Border.Resources> <ResourceDictionary Source="myfile.xaml" /> </Border.Resources> <StackPanel> <Button Content="Button inside border" /> <TextBlock>TextBlock inside border</TextBlock> </StackPanel> </Border> <Button Content="Button outside border" /> </StackPanel>

Although Silverlight does not support styling descendents with styles loaded from an external dictionary ISM does provides an attached property that enables this scenario: ResourceDictionaryUri.  Here is the Silverlight+ISM equivalent of the XAML above:

<StackPanel> <Border controls:ImplicitStyleManager.ApplyMode=“OneTime“ controls:ImplicitStyleManager.ResourceDictionaryUri=“myfile.xaml"> <StackPanel> <Button Content="Button inside border" /> <TextBlock>TextBlock inside border</TextBlock> </StackPanel> </Border> <Button Content="Button outside border" /> </StackPanel>

That's it.  Remember to set the build action of your XAML resource dictionary file to "Content."  That allows you to reference it using a relative Uri.  You can also set it to "Resource" if you like but you will be required to specify the absolute path.

How Does ISM Work?

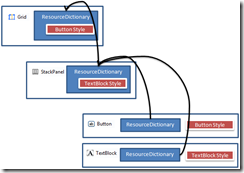
ISM hooks the LayoutUpdated event of the FrameworkElement it is applied to.  When the LayoutUpdated event is raised it traverses the logical descendents of the element and applies styles to them where applicable styles are found. 

howdoesitwork

Those of you familiar with WPF may know that is logical descendent is an element in the same namescope of its parent element.  It is important to differentiate between logical descendents and visual descendents.  The latter is styled by ISM and the former is not. 

Understanding the Logical Tree

Consider the following XAML:

<Grid> <Button Content="This is a button"></Button> </Grid>

The Grid's logical tree consists of the two elements you see in the XAML: the Grid and the Button.  On the other hand the visual tree looks like this:

visualtree

The visual tree includes all of the element's in the Button's default template.  Neither WPF or ISM styles these elements because it would cause unpredictable results.  Notice that the Button's visual tree contains a TextBlock.  If styles were applied to all element's in the visual tree a style intended to set all of the TextBlock's font sizes to 30 would also cause all the Button's font sizes to jump to 30.  That wouldn't be very logical now would it? ;-)

For more information on how to programmatically determine if an element is in the logical tree or not check this post out.  If you want a more in-depth explanation of how ISM was implemented check this post out.

Performance Considerations

ISM is a powerful control but with great power comes great responsibility.  Traversing the logical tree is both CPU and memory intensive.  Under the circumstances you'll want to ensure that you are choosing an ApplyMode that delivers an acceptable level of performance.

The "Auto" apply mode is the most expensive because it traverses the tree whenever the LayoutUpdated event is raised.  This event is raised very often.  Simply scrolling up and down in your browser may cause the event to be raised fifty times.  As a result this apply mode is generally only appropriate for small applications or for prototyping.  In contrast the "OneTime" apply mode is comparatively inexpensive because the tree is only traversed once at. 

Fine I'll use OneTime.  What if I need to style a dynamically created control though?

If you want to ensure a dynamically created control is styled you can use ISM's "Apply" method.  You can manually call this method after adding your dynamically generated control to the styled container:

Button b = new Button { Content = "I'm a dynmaically generated button." }; myStyledStackPanel.Children.Add(b); ImplicitStyleManager.Apply(myStyledStackPanel);

Themes, Themes, and More Themes

You can use ISM directly to apply your own themes or you can use any one of the theme containers available with the Silverlight Toolkit.  The themes use ISM and an external resource dictionary file under the hood.  As a result themes are only applied to elements in the logical tree and have the same performance trade-offs as ISM.  To take a look at the available themes go the Silverlight Toolkit's Theming page.

For information on how to customize the themes check out Mehdi Slaoui Andaloussi's blog.

Thursday, October 30, 2008

ImplicitStyleManager: Under the Hood

In this post I'll delve into the functional programming techniques that were used to develop ImplicitStyleManager.  If you want to know how to use ISM to add fresh new looks to your Silverlight applications take a look at this post.

ISM is a great candidate for a functional solution.  There is no unpredictable user inputs to muddy the waters which is rare for a control.  Following best practices I did my best to separate the functional task of generating a sequence of all elements to be styled from the imperative task of applying the styles to those elements.  I thought I'd share it with you because it's yet another example of how powerful and flexible functional programming can be.

Walking the Tree

The code required to generate the sequence (IEnumerable<T>) of tree nodes is actually very simple.  It traverses the logical tree and returns a flat sequence of elements, their merged dictionaries, and the style applicable to them (if found).

BaseMergedStyleDictionary initialDictionary = GetMergedStyleDictionary(element); // Create stream of elements and their base merged style // dictionaries by traversing the logical tree. var elementDictionaryAndStyleTriples = FunctionalProgramming.Traverse( // the head node new { Element = element, ResourceDictionary = initialDictionary, Style = initialDictionary[element.GetType().FullName] as Style }, // the function that accepts a node and returns all of its child nodes (elementDictionaryAndStyleTriple) => from child in elementDictionaryAndStyleTriple.Element.GetLogicalChildrenDepthFirst() let resourceDictionary = // create a merged resource dictionary for the current child node (BaseMergedStyleDictionary) new MergedStyleResourceDictionary( ImplicitStyleManager.GetExternalResourceDictionary(child) ?? child.Resources, // the resource dictionary of the current element elementDictionaryAndStyleTriple.ResourceDictionary) // the resource dictionary of the parent let style = resourceDictionary[child.GetType().FullName] as Style select new { Element = child, ResourceDictionary = resourceDictionary, Style = style }, // the predicate function that determines whether a node should be explored or not (elementDictionaryAndStyleTriple) => recurse || (ImplicitStyleManager.GetApplyMode(elementDictionaryAndStyleTriple.Element) != ImplicitStylesApplyMode.OneTime || !ImplicitStyleManager.GetHasBeenStyled(elementDictionaryAndStyleTriple.Element)));

All of the work is done in one function: Traverse.  You won't believe how simple it is.  It takes an initial value (usually the head of the tree), a function which accepts a node and returns that node's children, and a predicate that determines whether to explore a node or not.

/// <summary> /// Traverses a tree by accepting an initial value and a function that /// retrieves the child nodes of a node. /// </summary> /// <typeparam name="T">The type of the stream.</typeparam> /// <param name="initialNode">The initial node.</param> /// <param name="getChildNodes">A function that retrieves the child /// nodes of a node.</param> /// <param name="traversePredicate">A predicate that evaluates a node /// and returns a value indicating whether that node and it's children /// should be traversed.</param> /// <returns>A stream of nodes.</returns> internal static IEnumerable<T> Traverse<T>( T initialNode, Func<T, IEnumerable<T>> getChildNodes, Func<T, bool> traversePredicate) { Stack<T> stack = new Stack<T>(); stack.Push(initialNode); while (stack.Count > 0) { T node = stack.Pop(); if (traversePredicate(node)) { yield return node; IEnumerable<T> childNodes = getChildNodes(node); foreach (T childNode in childNodes) { stack.Push(childNode); } } } }

With this little function you can flatten almost any tree efficiently.   How sweet is that?  It's important to point out that although the functions that Linq provides are very powerful they are just primitives.  There are many functions like this one just waiting to be written so that Linq functions can be applied to more complex operations.

Building the Merged Dictionaries

You may have noticed that I'm not just returning the elements in the visual tree, I'm returning an anonymous struct that pairs each element with its merged resource dictionary as well as that element's applicable style, which is retrieved from its merged resource dictionary.  An element's merged dictionary is an object that has a pointer to the element's resource dictionary and its logical parent's merged dictionary.  If you attempt to look up the resource at a key in the dictionary it will first attempt to locate the key in its element's local resources and then in that of its parent.  The parent dictionary will do the same and the result is that we look up the logical tree backwards for a resource until we reach the root.

mergeddictionary

Merged dictionaries act like an immutable linked list.  Instead of physically merging dictionaries for each item (using valuable time and space) every child of a parent shares it's parent's merged dictionary but adds another node at the front - it's merged dictionary.  This is safe to do because the list is never changed.  Each child appears to have its own copy of the entire list but in reality it is sharing all previous elements with each of its siblings.  Immutable data structures and functional programming were made for each other.  You can read more about their benefits in Eric Lippert's "Immutability in C#" blog.

Filtering the Sequence

Now that we've flattened the tree we need to filter it so that we only apply styles to the elements that have an applicable style.  We also want to avoid applying styles to elements that are already styled which is not supported in Silverlight 2.  This is trivial now that we've expressed the tree traversal as a sequence.

// filter out those elements that are already styled and those elements for which no style could be found var triplesThatShouldBeStyled = elementDictionaryAndStyleTriples.Where(triple => triple.Element.Style == null && triple.Style != null);

Applying the Styles

Now that we've done all the hard work in the tree traversal this task is so small it barely deserves it's own section.  However I wanted to reemphasize that there is a clean separation between generating data and modifying it.

// Apply styles to elements in the sequence foreach (var elementToStyleAndDictionary in triplesThatShouldBeStyled) { elementToStyleAndDictionary.Element.Style = elementToStyleAndDictionary.Style; // If the element's ApplyMode is set to OneTime and it's been styled, note that to avoid restyling it if (ImplicitStyleManager.GetApplyMode(elementToStyleAndDictionary.Element) == ImplicitStylesApplyMode.OneTime && (VisualTreeHelper.GetChildrenCount(elementToStyleAndDictionary.Element) > 0)) { ImplicitStyleManager.SetHasBeenStyled(elementToStyleAndDictionary.Element, true); } }

This code needs very little explanation.  It just applies each element's style and sets a flag to ensure that elements with their ApplyMode set to OneTime don't get traversed again later.

Why Separate Data Generation and Modification?

There are a lot of C# developers who have become accustomed to writing code in a more imperative style.  I might've written ISM with a series of foreach loops, applying styles to elements as they were retrieved.  Not only would such an approach be needlessly verbose and more complex it would be much more difficult to spread the work across multiple processors.  If you write your programs in a functional style you will be able to leverage the biggest advantage Silverlight has over its competitors in the RIA space:

Silverlight is a cross-platform version of the .NET Framework.

This fact is sometimes forgotten with all the focus on its whiz-bang vector graphics, flexible template model, and superior media codecs.  Because of the work done by the CLR team Silverlight is light-years ahead of its competitors when it comes to parallel processing.  Even the most sophisticated AJAX app can't max out your quad core.  The other major contender in the R.I.A. space can't even so much as spawn a thread.  The future is multi-core and Silverlight is ready.

To Sum Up

I think it's impressive how little code is actually required to add WPF-like implicit styling behavior to Sivlerlight.  The fact that I get to write code in a modern language like C# gives me a huge amount of job satisfaction.  I hope you guys have fun with ISM.

P.S. Some of you weisenheimers may have noticed that the code above uses both anonymous structs and query comprehensions even though I swore to avoid them on Silverlight.  As a matter of fact the actual source uses tuples and extension method calls instead.  I rewrote it to enhance the code's clarity for the purposes of this blog post.  If you're curious about my reasons for avoiding anonymous structs and query comprehensions in Siverlight check this post out.

Wednesday, October 29, 2008

Building an Observable Model in Silverlight

Now that Silverlight 2 has been released .NET web developers can begin writing rich Internet applications in languages like C# and VB.NET which they know and love.  However if you have spent the last few years developing web applications using ASP.NET you may have developed certain habits that will not serve you well in when writing Rich Internet Applications.  Undoubtedly one of those habits is avoiding state.  Sure you could always use the view state or worse, the session state to store information across page loads.  However it's generally advisable to use as little state as possible to maximize the scalability of your ASP.NET applications.  It's important to unlearn this behavior now that Silverlight 2 has been released. 

Repeat after me: "State is good." 

Client state, this is.  Modern hardware is fast and memory is cheap.  Part of building rich Internet applications is leveraging all that juice to transform what users expect from web applications.

Of course this calls for a very different set of design patterns than the ones we use to build stateless applications.  In the RIA world it is no longer necessary, nor efficient, to destroy and recreate objects all the time. However if we keep objects around a long time we run the risk that they will get into inconsistent states.  An example of this problem is an application not updating the status bar and disabling the "Save" menu item when a new file is loaded in a text editor application.  The problem of synchronizing UI elements gets exponentially more complex as more UI elements are added.

One way of keeping long-lived view objects synchronized with each other is to design an observable model.  Many of your favorite MS applications (ex. Visual Studio, Office) use this model.  I'm not going to explain the observable model to you in detail because it has been explained very well by others already.  To summarize, in an observable model view objects subscribe to model objects and are responsible for updating themselves when the model changes.  It sounds simple but it is a very powerful way of managing complexity in UI's because you can add new types of view objects without touching the code in either the model or the other views.

In this blog post I want to show you how to create an observable model in Silverlight.  Let's use Silverlight Charts as an example, partly because it's a simple example of an observable model in Silverlight and partly because I just spent the last three months working on it with Delay (and others) so it's fresh in my mind.  

The Observable Model in Silverlight Charts

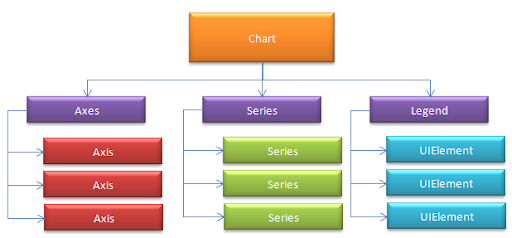
The Silverlight Chart has a collection of axis controls, series controls, and a legend control with a collection of UIElement's.  All of the elements in the various collections have to be inserted into the Chart's (or Legend's) visual tree.  The Chart (and Legend) needs to detect changes to their collections and add or remove the UIElements from visual tree accordingly.  Obviously the controls also need to be removed from the template parts when they are removed from the collection.  In this case the collections make up the model and the Chart and Legend's panel template parts are the views.

The Model

chart

The View

visualtree

Responding to Collection Changes

In the .NET framework there are several interfaces we have available to us to help us create an observable model.  You may be familiar with the INotifyCollectionChanged interface in the System.ComponentModel namespace.  It raises an event that informs listeners of what changes occurred in the collection.  There is also a handy object that implements it called ObservableCollection<T>.  The ObservableCollection is a good choice for our model collections.  It even implements IList so it can be populated in XAML like so:

<charting:Chart Title="Typical Use"> <charting:Chart.Series> <charting:BarSeries Title="Population" ItemsSource="{Binding PugetSound, Source={StaticResource City}}" IndependentValueBinding="{Binding Name}" DependentValueBinding="{Binding Population}"/> </charting:Chart.Series> </charting:Chart>

When the Series observable collection is changed the Chart responds by synchronizing the objects in the collection with those in the SeriesContainer template parts.

Responding to Property Changes

Although not shown above there is another template part behind the SeriesContainer called the GridLinesContainer.  This is where the grid lines control associated with a particular axis are inserted so that they appear behind the series.  The axis exposes the GridLines control it wants inserted into the GridLinesContainer via it's GridLines dependency property.  The Chart must detect changes to this property and ensure that the control exposed via this property is inserted into the GridLinesContainer template part.

You're probably already familiar with INotifyPropertyChanged.  Implementing this interface allows a object to signal to the UI that it has changed.  Although it might look like this would be the interface to use it is not appropriate in this case.  Since axis is a control and its GridLines property is a dependency property, a more appropriate way of exposing changes to it is to expose a DependencyPropertyChanged event of type DependencyPropertyChangedHandler<T>. 

There are three advantages to using DependencyPropertyChangedHandler:

1.  It is generic and is therefore statically typed.

2.  It provides both information about both the old and new value.  This makes it easy for the chart to find the old control and remove it. 

3.  It is a routed event which will provide more flexibility as Silverlight matures and incorporates more WPF features for handling routed events.

Overcoming Limitations

Synchronizing property values or responding to property changes is more challenging in Silverlight than in WPF.  There are a few limitations you should be aware of:

No Notifications on Custom Dependency Properties

Binding objects that bind to custom dependency properties (those that you create yourself vs. those that are native) are not able to detect when a property's value changes.  As a result if you bind two custom dependency properties together the bound property will only be set once regardless of how many times the source property is changed.  One way of overcoming this limitation is expose dependency property change events for the custom properties you would like to bind together and synchronize their values in the event handlers.

No Multi-Bindings

The solution to this problem is similar to the previous one.  Hook the property change events of several dependency properties and do your aggregation operations in code instead of inside of a value converter.

No Way of Getting a PropertyDescriptor for a Dependency Property

There's no way of getting a property descriptor for a dependency property in Silverlight.  As a result this wont work:

DependencyPropertyDescriptor descriptor = DependencyPropertyDescriptor.FromProperty (UIElement.VisibilityProperty, typeof(UIElement)); descriptor.AddValueChanged (this.labelShowHide, new EventHandler(VisibilityChanged));

So how do you listen for a change to a native dependency property?  One solution to this problem is to create a private attached dependency property in your class (assuming it inherits from DependencyObject), bind it to the native dependency property, and hook the PropertyChanged event of your attached property.  This will work:


public void ListenForChangeToProperty(string propertyName, UIElement element) { Binding b = new Binding(propertyName) { Source = element }; element.SetValue(HiddenAttachedProperty, b); } private static readonly System.Windows.DependencyProperty HiddenAttachedProperty = System.Windows.DependencyProperty.RegisterAttached( "HiddenAttached", typeof(double), typeof(MyClass), new System.Windows.PropertyMetadata(OnHiddenAttachedPropertyChanged)); private static void OnHiddenAttachedPropertyChanged(System.Windows.DependencyObject dependencyObject, System.Windows.DependencyPropertyChangedEventArgs eventArgs) { UIElement source = dependencyObject as UIElement; double value = (double) eventArgs.NewValue; // Respond to changes to property }

An Observable Model is a Beautiful Thing

It's like a guitar that is always in tune no matter how hard you thrash.  While the aforementioned limitations do make it very difficult to create observable models declaratively, Silverlight provides the necessary interfaces and delegates so that you don't need to reinvent the wheel.  Although you'll be writing more code in Silverlight than in WPF you'll still find that it's surprisingly easy.  Now that you have some tricks to help you overcome the known limitations you should embrace this pattern so that you can deliver the rich UI's your clients expect without spending your weekends tracking down bugs at the office.

Tuesday, October 28, 2008

Silverlight Toolkit Released!

The Silverlight Toolkit was released today! I, along with the rest of the Platform Presentation Controls team have been toiling on this release for months and we couldn't be more excited. ImplicitStyleManager As some of you may have been able to figure out from my last post I wrote the ImplicitStyleManager control which brings WPF-style implicit styling to Silverlight applications. It's a good example of functional programming in the wild (with available source to boot) and I'm very proud of it. For more information on what you can do with it stay tuned. Also be sure to check out Beatriz Stollnitz's blog. She was responsible for testing this control and without her efforts it would not be nearly as usable. I'll post more about this when I get the chance. The API's pretty self-explanatory so I'll focus on the implementation. Silverlight Charts The big one which I've been working very hard on (along with Delay and a few other developers who I wont mention as I haven't gotten their permission yet) is the Silverlight Charts. Be sure to check out Delay's blog for an intro to charting. In the coming days I'll be blogging about the architecture of the solution. I feel extremely fortunate to have gotten the opportunity to play a key role in the development of a control that will be around for such a long time. Since it is brand new we were given free reign to come up with the API and architecture. These opportunities don't come along every day. I would be posting more about it right now but I've taken a well-deserved couple of days off. :-) Couldn't resist a short blog post though. Enjoy the controls!

Monday, October 27, 2008

Silverlight and the Logical Tree

Those of you familiar with WPF may experience some disorientation when acclimating to Silverlight.  Although Silverlight has certain new and exciting capabilities currently lacking from WPF there are certain features missing  from Silverlight which you have come to know and love.  One of those features is the logical tree.  The official word from Microsoft is that the logical tree is not necessary in Silverlight because it does not support ElementName bindings.  That said there is a trick you can use if you would like to figure out if an element is the logical ancestor or descendent of another element: confirm that the other object is in the same name scope.  You can always find out if two elements are in the same name scope by calling the FindName method on one and passing in the name of the other object.

element.FindName(otherElement.Name) == otherElement

But what if an object does not have a name?  Well the answer is simple: you give it one.  It is relatively easy to ensure that each object has a unique name by creating a GUID.  Although it is unpleasant to assign names to elements in the visualtree for no other purpose than to determine if they are logically related to other elements it is currently the only way of discerning the information that I'm aware of.  Of course better ideas are always welcome. :-)

Using this trick we can write a logical tree helper class like the one available in WPF.  However instead of using the same API as WPF let's change it a little to make it more Linq friendly.  First we'll write  a GetVisualChildren function that returns the visual children as a sequence.


/// <summary> /// Retrieves all the visual children of a framework element. /// </summary> /// <param name="parent">The parent framework element.</param> /// <returns>The visual children of the framework element.</returns> internal static IEnumerable<DependencyObject> GetVisualChildren(this DependencyObject parent) { Debug.Assert(parent != null, "The parent cannot be null."); int childCount = VisualTreeHelper.GetChildrenCount(parent); for (int counter = 0; counter < childCount; counter++) { yield return VisualTreeHelper.GetChild(parent, counter); } }

That was easy.  Now we can run Linq queries on the visual children of an element.  Now let's write a function that recurses down the tree depth-first and grab every immediate descendent that is in the same name scope of the element.  In the interest of speed we'll manage the stack ourselves.

public static class LogicalTreeHelper { /// <summary> /// Retrieves all the logical children of a framework element using a /// depth-first search. A visual element is assumed to be a logical /// child of another visual element if they are in the same namescope. /// For performance reasons this method manually manages the stack /// instead of using recursion. /// </summary> /// <param name="parent">The parent framework element.</param> /// <returns>The logical children of the framework element.</returns> internal static IEnumerable<FrameworkElement> GetLogicalChildren(this FrameworkElement parent) { Debug.Assert(parent != null, "The parent cannot be null."); EnsureName(parent); string parentName = parent.Name; Stack<FrameworkElement> stack = new Stack<FrameworkElement>(parent.GetVisualChildren().OfType<FrameworkElement>()); while (stack.Count > 0) { FrameworkElement element = stack.Pop(); if (element.FindName(parentName) == parent) { yield return element; } else { foreach (FrameworkElement visualChild in element.GetVisualChildren().OfType<FrameworkElement>()) { stack.Push(visualChild); } } } } }

The EnsureName function just checks to see whether an element has a name and names it if it does not. There you have it: a LogicalTreeHelper for Silverlight. 

About Me

My photo
I'm a software developer who started programming at age 16 and never saw any reason to stop. I'm working on the Presentation Platform Controls team at Microsoft. My primary interests are functional programming, and Rich Internet Applications.