Thursday, July 9, 2009

Introducing the Rating Control

Boys and girls, its the most wonderful time of the year: a new version of Silverlight is shipping.  Silverlight 3 shipped today along with a refresh of the Silverlight Toolkit.  For this release I had the pleasure of writing the Rating control which is available in both the Silverlight 2 and 3 versions of the Toolkit.  In this post I'll give you a high level overview of how Rating works and how you can customize it.

Using Rating

The Rating control is located in the System.Windows.Controls namespace in System.Windows.Controls.Input.Toolkit.dll.  Once you've added a XAML namespace you can create a Rating like this...

<inputToolkit:Rating ItemCount="5" />

This will create a Rating control with five stars:

rating

Giving Rating a Value

The Rating control has a Value property which is a ratio from 0 to 1.  The Value property is a nullable double.  In other words the Value property is either between 0% and 100% or it is null.

The Rating control has two selection modes: Continuous and Individual.  In Continuous mode (the default) the control behaves the way most star-based Rating controls do: filling the first two stars and half of the middle one.

<inputToolkit:Rating ItemCount="5" Value="0.5" SelectionMode="Continuous" />

continuous

However in individual mode, the stars leading up to the middle star are not filled:

<inputToolkit:Rating ItemCount="5" Value="0.5" SelectionMode="Individual" />

individual

Individual mode is useful when you want to offer discrete selection options:

individualcustom

Adding Rating Items

Rating is an ItemsControl with an ItemCount convenience property which adds instances of RatingItem to the Items collection.  Therefore this...

<inputToolkit:Rating ItemCount="5" />

...is equivalent to this...

<inputToolkit:Rating> <inputToolkit:Rating.Items> <inputToolkit:RatingItem /> <inputToolkit:RatingItem /> <inputToolkit:RatingItem /> <inputToolkit:RatingItem /> <inputToolkit:RatingItem /> </inputToolkit:Rating.Items> </inputToolkit:Rating>

...and this:

var rating = new Rating { ItemsSource = new[]{"", "", "", "", ""} };

ItemCount is convenient if you don't need to bind your rating items to an underlying data source or otherwise vary their appearance.  However since RatingItems are content controls if you do bind to a data source your data will be displayed below the RatingItem. 

var rating = new Rating { SelectionMode = RatingSelectionMode.Individual, ItemsSource = new[]{"Hate", "Bored", "Good", "Great", "Love"} };

The Template

The Rating ItemsControl uses instances of the RatingItem class as its item container.  RatingItem inherits from ContentControl and its template contains an instance of the LinearClipper control.  The LinearClipper control is used to hide a portion of the star in the RatingItem template.

ratingtemplate

In addition to the common visual states the RatingItem control has a "Fill States" visual state group which contains the following states: "Empty", "Partial", and "Filled."

The LinearClipper has a property ExpandDirection which can be used to determine whether it expands Up, Down, Left, or Right.  By changing this property along with the ItemPanelTemplate property of Rating you can customize Rating to display and reveal stars vertically.

As Rating is an ItemsControl all the tricks you already know to customize an ItemsControl's appearance apply.  I won't rehash how to style an ItemsControl here, there's plenty of information on MSDN.  For comprehensive examples of re-templated Rating controls you can take a look at the Rating sample page in Silverlight Toolkit samples.

Rate Rating

Rating is being released under the "Preview" quality band.  That means we're looking for feedback on ways in which we can improve it.  Try it out and let us know what you think on the CodePlex forums.

Tuesday, June 2, 2009

Better Unit Tests with Test.Assert() for NUnit/VSTT/SUTF

It’s been over ten years since Kent Beck created SUnit, the first unit testing framework for SmallTalk.  Since then, hundreds of unit testing frameworks have been created in its image, one for nearly every platform and programming language.  JUnit, the open-source Java unit testing framework, begat NUnit, the popular .NET port, which inspired Visual Studio Team Test, which was ported to the Silverlight Unit Testing Framework, and it was good. 

For the most part NUnit’s and VSTT’s API’s are the same as those of JUnit. This is probably a good thing because it makes it much easier for Java developers to adopt .NET.  It was also a natural decision given how similar C# and Java were when NUnit was created. However .NET programming languages have evolved rapidly in the last few years.  Have you ever stopped to wonder whether the API’s for the .NET unit testing frameworks should still be so similar to those of JUnit?  

Nowadays C# and VB.NET are capable of some very powerful code transformations.  Despite the fact that .NET developers are conditioned to think of API’s and programming languages as separate the reality is not so simple.  The capabilities of programming languages tend to influence the design of API’s. The question is this: Can we use the advanced features of .NET programming languages to create better unit testing API’s?

“What’s wrong with Unit Testing API’s?  They’re pretty straightforward.”

There are three things wrong with the assertion API’s used by the major unit testing frameworks:

1.  You Can’t Use Expressions

Let’s take a look at a typical Visual Studio Team Test.

[TestMethod]
public void TestStackIsEmptyWhenCreated()
{
    Stack emptyStack = new Stack();
    Assert.AreEqual(emptyStack.Count, 0, "Stack is not empty.");
}

Ask yourself this question: Is the AreEqual method really necessary?  Our programming languages already have a rich set of comparison operators.  Most of us are accustomed to writing debug assertions this way:

Debug.Assert(emptyStack.Count == 0, "Stack is not empty.");

Operators make common operations more recognizable to the human eye. If comparison operators are easier to read than the Assert methods why do we use the latter in our unit tests? 

The reason is that we want descriptive failure messages in the event our test fails. If we fail the test above by adding an item to the stack we get a failure message much like this:

TestStackIsEmptyWhenCreated failed.  Values are not equal. Expected 0, got 1. Stack is not empty.

Notice that in addition to including what type of comparison operation that failed the framework also provides the values being tested.  If we were to specify an expression (as in the Debug.Assert example above) it would get compiled into executable code and by the time the UT framework got our expression it would be a black box.  As a result it would be impossible to determine what kind of comparison we were attempting or the values of the arguments.  Therefore Assert methods are necessary, despite the fact that they are ugly.

2.  Assert.AreEqual vs. Assert.AreSame

Another problem caused by the inability to use expressions is that we must be explicit about whether we want to use value or reference comparisons.  Have you ever used Assert.AreEqual when you should’ve used Assert.AreSame or vice versa?  In some circumstances this can lead to false positives or negatives.  It is especially annoying for C# and F# developers as we are used to our compilers choosing the appropriate comparison type for us based on context.

3.  Redundant Assertion Messages

It is generally considered good practice to add a custom assertion message to provide more context in the event a test fails.  This is especially important if a test makes multiple calls to the same Assert method.  Let’s say we left the assertion message out of our unit test:

[TestMethod]
public void TestStackIsEmptyWhenCreated()
{
    Stack emptyStack = new Stack();
    Assert.AreEqual(emptyStack.Count, 0);
}

The resulting message would be:

TestStackIsEmptyWhenCreated failed.  Values are not equal. Expected 0, got 1.

Of course this is a very simple test so you could probably infer what went wrong.  It is a little cryptic though.  In a larger test it would be much more difficult to isolate the issue.

So what’s wrong with assertion messages?  They’re superfluous.  Ask yourself this question: If you didn’t have to specify a message for the Unit Test Framework to display on failure, would you add that message as a comment above the line of code? 

// Testing whether stack is empty
Assert.AreEqual(emptyStack.Count, 0);

The answer is usually no.  Assuming you’ve properly named your variables it is rarely necessary to comment assertions.  In an ideal world our Unit Testing Framework would output the line of code that failed, just as our compilers do when they encounter syntax errors.  This would make most assertion messages redundant.

The Root Problem

All of these issues are caused by the same root problem.  Conceptually Unit Testing frameworks are an extension of your compiler.  Compilers report static errors such as malformed code and type mismatches and unit testing frameworks report run-time errors such as unexpected values.  The reason why Unit Testing API’s are so clunky is that our Unit Testing frameworks don’t have access to as much information as our compiler does.  Compilers have access to the expression trees generated by our code.  They can analyze the code and determine what type of comparison we are attempting, and whether it is a value or reference comparison.  If the compiler encounters an error it can print the exact line of code or expression responsible.

What if there was a way to make our Unit Testing Frameworks as smart as our compilers?

Introducing Test.Assert()

Turns out it is possible to express assertions as expressions and get all the feedback provided by the Assert methods when a test fails (and even more).

Assertions as Expressions

Let’s rewrite our unit test using the Test.Assert() method:

using Unfold.Testing.VSTT;

// snip...

[TestMethod]
public void TestStackIsEmptyWhenCreated()
{
    Stack emptyStack = new Stack();
    emptyStack.Push("an item that shouldn't be here.");
    Test.Assert(() => emptyStack.Count == 0);
}

When we run this test and it fails we’ll get a message resembling this:

TestStackIsEmptyWhenCreated failed.  Values are not equal. Expected 0, got 1. emptyStack.Count = 0

Notice that we get the same failure message as Assert.AreEqual in addition to the expression responsible for the failure!

Compound Expressions

Now that we can express assertions as expressions you may be wondering whether it is possible to express several assertions in a single compound expression.  With Test Extensions it’s as easy as using the “and” operator.

Test.Assert(() => customer.Name != null && customer.Name != “”);

Now our assertions are much easier to read as well as shorter!

“Hold on.  Won’t using compound expressions make it harder to figure out which expression failed?”

No.  Test.Assert doesn’t display the line of code that fails, it displays the expression that fails.  For example if, in the test above, the customer’s name was an empty string we’d get the following failure messages:

TestCustomerDefaultPropertyValues failed.  Values are same.  Expected not “”, got “”.  customer.Name != “”

“Okay, but what if I still want to specify a custom assertion message?”

No problem.  Test Assert has an overload for that:

Test.Assert(() => customer.Name != null && customer.Name != “”, "Customer name is null or empty.");


“Is it available for my Unit Testing Framework?”

Yes – assuming you’re using NUnit or VSTT :-).  I’m making the source available under MS-PL so you’re free to port it to your unit testing framework of choice.  You’ll find the port is trivial if your unit testing framework uses the familiar Assert methods.

“What about the Silverlight Unit Testing Framework?”

Don’t worry, I haven’t forgotten about Silverlight developers :-).  In fact Test.Assert() has been integrated into the Silverlight Unit Testing Framework and will ship with the next version.

“How does it work?”

Test.Assert() improves your Unit Testing Framework by giving it access to the same information your compiler has: the expression tree.  Test.Assert is similar to Linq to SQL.  It converts your assertion expression into data, analyzes it, and then invokes the appropriate Assert methods.

howitworks

Like Linq to SQL, Test.Assert() only supports a subset of the functionality provided by the underlying API.  For certain assertions, particularly those that don’t use operators, you will still need to use the Assert methods.

“Which Assert Methods are supported?”

Here’s a table that shows which expressions map to which Test.Assert methods.

Expression

NUnit

VSTT/Silverlight Unit Testing Framework

value == true Assert.IsTrue Assert.IsTrue
value == false Assert.IsFalse Assert.IsFalse
value == 2 Assert.AreEqual Assert.AreEqual
value != 2 Assert.AreNotEqual Assert.AreNotEqual
value == “Jim” Assert.AreSame Assert.AreSame
value != “John” Assert.AreNotSame Assert.AreNotSame
“Jim” is string Assert.IsInstanceOf Assert.IsInstanceOfType
!(“Jim” is string) Assert.IsNotInstanceOf Assert.IsNotInstanceOfType
value < 2 Assert.Less N/A
value <= 2 Assert.LessOrEqual N/A
value > 2 Assert.Greater N/A
value >= 2 Assert.GreaterOrEqual N/A
double.IsNaN(value) Assert.IsNaN N/A
string.IsNullOrEmpty(“Jim”) Assert.IsNullOrEmpty(“Jim”) N/A
!string.IsNullOrEmpty(“Jim”) Assert.IsNotNullOrEmpty(“Jim”) N/A

If Test.Assert doesn’t recognize any patterns in your expression it will fallback to the Assert.IsTrue method and pass it your entire expression.  Often this - in addition including the expression in the failure message - is adequate.  If you want to ensure a specific Assert method is used you can always call that method directly as you would have before.

“What about VB.NET support?”

The expression in the failure message is actually language agnostic and is the produced by calling the ToString() method of the System.Linq.Expressions.Expression object.  Sometimes it looks like VB.NET, sometimes it looks like C#.  There is no reason why you can’t use Test.Assert() in VB.NET.

“What about F# support?”

Although the F# compiler is not capable of converting code into Linq expression trees, F# does have it’s own expression tree format which can be produced using the quotations language syntax. 

let expressionTree = <@@ value = “” @@>

You can convert F# expression trees to Linq expression trees using the F# Power Pack available with the latest version of F#.  It should be trivial to write a wrapper method which does the conversion and forwards it to Test.Assert().

“Okay, okay.  Where can I get it?”

You can download the source project (MS-PL) here.  It includes the VSTT and NUnit versions.  Test.Assert() will be integrated into the next release of the Silverlight Unit Testing Framework.  Enjoy.

Sunday, May 24, 2009

Better WPF/Silverlight Development in F#: Attached Dependency Properties

A very common idiom in WPF/Silverlight is the attached property.  Attached properties are properties that only have meaning in certain contexts, usually in relation to another class.  Attached properties are everywhere in WPF/Silverlight.  Although they are widely useful they are most commonly used with layout panels.  By introducing the notion of attached properties the architects of WPF were able to avoid having to add every conceivable property for every conceivable layout panel to each control (Top, Left, Grid Column, Grid Row, Rotation, and so on).

Of course neither the CLR nor C# has any notion of attached properties.   Therefore attached properties are typically implemented using a pair of static set and get methods on the Layout class.  These static setter/getter methods use a static dictionary to link a control to its attached property value.  As an example the Canvas panel lays controls out in a Cartesian coordinate system and has a Left attached property and a Top attached property.  Specifying these properties on a control looks something like this in C#:

Canvas.SetLeft(myTextBox, 23.0); Canvas.SetTop(myTextBox,24.0); myCanvas.Children.Add(myTextBox);

This works but it isn't ideal.  For one thing attached properties are not discoverable because they do not show up in the control’s intellisense list. However the real issue though is that the code is too low-level, exposing the developer to the implementation of attached properties rather than simply letting them express their intent.

F# has the notion of extension properties.  Like extension methods in C#, extension properties can be defined on a class outside of the class definition.  So with the smallest dab of code...

type UIElement with member this.Left with get() = Canvas.GetLeft(this) and set(value) = Canvas.SetLeft(this, value) member this.Top with get() = Canvas.GetTop(this) and set(value) = Canvas.SetTop(this, value)

…I can do this…

myTextBox.Left <- 23.0 myTextBox.Top <- 24 myCanvas.Children.Add(myTextBox)

Much better.  Now the properties belong to the control but like extension methods they only appear when the assembly with Canvas is imported.  Unfortunately with the current build of F# you can't use attached properties in object expressions like this...

Image(Uri = Uri(“test.png”), Left = x * 20, Top = x * 40)

...however I've been assured by Don Syme himself that this will be fixed by VS 2010 Beta 2. 

So there you have it.  An admittedly small, but very nice trick.  More to follow.

.NET Language Evolution: Do you care?

Luca Bolognese recently announced that C# and VB.NET will now be co-evolved.  That is to say, no feature will be introduced to one without being added to the other.  I can't deny that this makes sense but as a language geek its certainly not very exciting news.  More ominously Luca hinted language evolution was going to "slow down."  Yikes.

ida_fossil_images

Apparently some of our customers are having difficulty ramping up on language features introduced alongside .NET 2.0.  Although I sympathize with these customers Microsoft made the right call when they took an aggressive approach towards language evolution, adding very significant new features inspired by functional languages.  Increasingly their customers are having to write scalable, asynchronous code to leverage multi-core processors.  These are hard problems and learning to think about them differently is essential to success.  There is a parallel here to the introduction of VB.NET and the phasing out of Visual Basic.

The news that C# and VB.NET evolution is going to taper off should not come as a surprise.  You can't keep adding features to a programming languages forever and it's especially hard when they have such a long heritage.  Under the circumstances Anders has done an admirable job.  Unfortunately there are certain functional algorithms that developers cannot, and will likely never be able to, express cleanly in either C# or VB.NET.

Enter F#.  Visual Studio 2010 Beta 1 is here and if you take the plunge you'll find that F# has finally been elevated to a first-class .NET language along-side C# and VB.NET.  We have every reason to believe F# will continue to evolve.  For starters it's just the first version.  Don Syme has also expressed interest in adding language features from Haskell as well.  The interesting question is: Does Language Evolution Matter?

There is some controversy over the importance of programming languages.  Some believe that it's primarily a developers knowledge of the existing class libraries that matters.  It's hard to deny this given the massive size of our libraries today.  However my personal experience is that in recent years learning the new language features introduced in C# has significantly improved my productivity, as well as the quality of my code.  It still fills me with such a sense of wonder that simply thinking about a problem differently can have such a profound effect.  It is for this reason that I've already made F# my primary language for play.  I hope to get the opportunity to use it at work at some point as well.  There are some very compelling reasons to use it to solve certain types of problems we face in WPF/Silverlight development. After all if not at Microsoft, then where? :-)

You can expect more Silverlight/WPF-related F# blog posts from me in the future.

Monday, April 27, 2009

Rx Framework: Asynchronous Programming Made Easy

A few weeks ago, to little fanfare Erik Meijer gave a presentation on the Rx Framework at the Lang.NET symposium.  You probably missed it.  Don't worry though.  It's no big deal.  It's only the culmination of one the most significant discoveries about the fundamental nature of asynchronous programming.  Oh yeah, and it's coming soon to the .NET Framework.

The Rx Framework uses Linq to build asynchronous code declaratively.  One of the perks of working at Microsoft is that I've been using it for months now.  Now that it has finally been talked about publicly I fully intend to start blogging about it but I'm waiting for the folks responsible, notably Wes Dyer, to take the plunge .  In the meantime here's a link to the presentation.  Watch it here while it's still on-line.

Thursday, April 16, 2009

An F# Solution to Eric Lippert's Challenge

David Anson recently brought Eric Lippert's challenge to my attention. I can't resist an opportunity to showcase F#'s strengths so I thought I'd throw my hat into the ring with a solution.

I'll briefly summarize the problem for those too lazy to follow the link :-):

Given a sequence of strings, concatenate them in a way similar to natural language.  For example the sequence "ABC", "DEF", "G", and "H" should be output as:

{ABC, DEF, G and H}

"ABC" and "DEF" should be output as...

{ABC and DEF}

...and finally an empty sequence should yield the following output:

{}

Of course this problem is simple enough to solve.  The real challenge is creating a solution which is declarative and efficient.  In order to achieve the desired result we must determine if each item is the first, the last, or is in the center without relying on random access. The typical approach in C# or VB.NET would be to get an enumerator from the sequence, step through it, and create a state machine that keeps track of the last two values.  Unfortunately this approach wouldn't scale and would be full of corner cases to handle. 

Let's see if we can do better with F#.

open System open System.Text let concat_string (list: string seq) = let tripleWise = Seq.append list [null] |> Seq.scan (fun (_, previousPrevious, previous) current -> (previousPrevious, previous, current) ) (null, null, null) let contents = tripleWise |> Seq.map (function | _, null, _ -> String.Empty | null, curr, null -> curr | null, first, _ -> first | _, last, null -> sprintf " and %s" last | prev, curr, next -> sprintf ", %s" curr) let builder = StringBuilder() contents |> Seq.iter (fun item -> (builder.Append(item) |> ignore)) sprintf "{%s}" (builder.ToString()) // prints "{ABC, DEF, G and H}" printf "%s" (concat_string ["ABC"; "DEF"; "G"; "H"]) // prints "{ABC and DEF}" printf "%s" (concat_string ["ABC"; "DEF"]) // prints "{ABC}" printf "%s" (concat_string ["ABC"]) // prints "{}" printf "%s" (concat_string [])

Let's take a look at the program step by step.

Type Inference, Whitespace Awareness, and Type Aliases

let concat_string (list: string seq) =

The first line of code contains the only type declaration in the entire program. Not too shabby.  For those that don't know "string seq" is a type alias for IEnumerable<string>.  Having a type alias for sequences is really nice because sequence processing is so common in both C# and F#.  Notice that like Python, F# is also whitespace aware.  These three features help F# achieve Python-like terseness without sacrificing performance or type safety.

Structural Types

My solution leverages F#'s native support for structural types, that is types that can be used to group arbitrary values together.  The following code creates a sequence of triples, which is a group of three values.  Notice that pattern matching is used to introduce descriptive identifiers for each element in the triple.

let tripleWise = Seq.append list [null] |> Seq.scan (fun (_, previousPrevious, previous) current -> (previousPrevious, previous, current) ) (null, null, null)

The "tripleWise" identifier refers to a sequence of triples containing the previous, the current, and the next item.  For example if the input list is defined as "ABC" and "DEF" then tripleWise will be:

(null,null,null), (null,null,"ABC"), (null,"ABC","DEF"), ("ABC","DEF",null)

The scan function works in a way very similar to System.Linq.Enumerable.Aggregate.  Here's a C# example that uses Aggregate to sum a sequence of numbers. 

new[]{2,4,4,2}.Aggregate((accumulatedValue, current) => accumulatedValue + current, 0)

The difference between scan and Aggregate is that scan returns the intermediary accumulated values as a sequence.  Given the example above scan would return a sequence of the following values:

0, 2, 6, 10, 12

An empty triple is used as the initial value and scan is passed a function which shifts each item in the sequence through the triple from the right to left. Each time it returns the resulting triple. Now we have a sequence of triples containing the previous, current, and next values.  For each triple we can determine if the middle item is the first item or the last item by checking whether the left or right items are null respectively.  Note that by appending null to the end of the original sequence in the first line we can be sure that the rightmost item in the last triple will be null.

Parallelizing the Code

We've successfully avoided state and mutation and we now have a sequence of snapshots of each value and its previous and next values.  This is very important.  Now we can process each triple in the sequence in any order we like: last to first, first to last, or first and last at the same time. 

let contents = tripleWise |> Seq.map (function | _, null, _ -> String.Empty | null, curr, null -> curr | null, first, _ -> first | _, last, null -> sprintf " and %s" last | prev, curr, next -> sprintf ", %s" curr)

The code above introduces a function that uses pattern matching to declaratively transform each possible triple into a string.  It just doesn't get much more readable than this.  This function is applied to each element using map (equivalent to System.Linq.Enumerable.Select) which yields a sequence of strings.

Just for fun let's see how much work it would take to parallelize the code above using Matthew Podwasaki's F# parallel extensions library and the latest CTP of the Parallel Extensions.

let contents = tripleWise.AsParallel() |> PSeq.map (function | _, null, _ -> String.Empty | null, curr, null -> curr | null, first, _ -> first | _, last, null -> sprintf " and %s" last | prev, curr, next -> sprintf ", %s" curr)

Notice that all I had to do was add 14 characters!  Now the code above should increase in speed at a linear rate with the number of cores on the processor.  Just try that with a state machine. :-) 

In the next five years its very possible we will see processors with over 50 cores on a desktop.  This is one of the reasons I get so frustrated when I see developers unnecessarily using state in their computations.  State is the new GOTO.  It should have to be justified.

State When it Makes Sense

Notice that at the end the strings are concatenated using a StringBuilder. 

let builder = StringBuilder() contents |> Seq.iter (fun item -> (builder.Append(item) |> ignore)) sprintf "{%s}" (builder.ToString())

This operation is decidedly impure.  This demonstrates another wonderful F# feature: the ability to perform stateful operations when it makes sense. It's important to understand there's nothing preventing us from writing C#-style imperative code in F#. 

An alternate, pure approach to the problem above would've involved using reduce (equivalent to System.Linq.Enumerable.Aggregate) to concatenate all the strings together using the + operator.  Although reduce, like map, can be parallelized it is unlikely that this would improve performance because concatenating strings creates so much extra work.  Each time two strings are concatenated a new one must be created and the contents of both strings must be copied to a new memory location.  Under the circumstances it makes sense to add a dash of state and use a StringBuilder.

Learn F#

The entire program is 25 lines including whitespace and imports and I'm very comfortable with its trade-offs.  I look forward to seeing what the other developers come up with but I'm confident that no one will do better in C#.  F# really shines when it comes to computation.  Learning it is a must if you consider yourself a sharp Elvis or an Einstein and you make your living with .NET.

Wednesday, March 25, 2009

Writing Your Own Silverlight Chart Series (Part 2): Implementing the Series

This is the second part in a series of three that explains how you can add series to Silverlight Charts.   We'll look at how Silverlight Chart's rich hierarchy of interfaces allow developers to create series that can play well with all the built-in series and axes, as well as custom series and axes written by other parties.  Once again...

BewareSilverlight charts is still in preview mode and there may be breaking changes in the future despite our best efforts to avoid them.

Last time we learn how to structure our series in such a way that designers can customize its appearance.  Now we can get down to the business of implementing our stock series.  The StockSeries class is responsible for the following:

  • Acquiring a data point style
  • Adding a legend item
  • Binding data points to a data source
  • Acquiring axes
  • Plotting the Data Points

Acquiring a Data Point Style

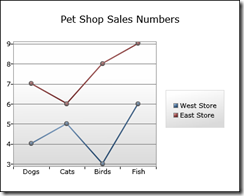
When we plot multiple series in the same Chart we want each of them to have different colors so that we can tell them apart.

ChartingIntroduction-Mar09-LineSeriesOnCategoryAxis

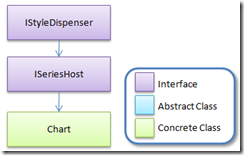
To ensure that our StockSeries uses a different color than the other series in the chart it must retrieve the next available style from its series host.  A series host contains series and provides them with various services.  Currently the only object that implements the ISeriesHost interface in Silverlight Charts is the Chart object.  Let's take a look at the Chart hierarchy.

blogimage12

When a series is inserted into a Chart the SeriesHost property of the series is set to that Chart.  Conversely when a series is removed from a chart its SeriesHost property is set to null.  When the SeriesHost property changes a protected method OnSeriesHostPropertyChanged is invoked.  We can override this method in our StockSeries class if we want to do something when the series is added or removed from a Chart. 

We should acquire a style from our series host when...

1.  The series host changes

2.  The RefreshStyles method of the base "Series" class is called

public class StockSeries : Series, IRequireGlobalSeriesIndex { private Style DataPointStyle { get; set; } protected override void OnSeriesHostPropertyChanged(ISeriesHost oldValue, ISeriesHost newValue) { AcquireDataPointStyle(); base.OnSeriesHostPropertyChanged(oldValue, newValue); } public override void RefreshStyles() { AcquireDataPointStyle(); Refresh(); } private void AcquireDataPointStyle() { if (SeriesHost != null) { using (IEnumerator<Style> styleEnumerator = SeriesHost.GetStylesWithTargetType(typeof(StockDataPoint), true)) { if (styleEnumerator.MoveNext()) { DataPointStyle = styleEnumerator.Current; } } } } // snip... }

In the example above we're using the IStyleDispenser's extension method GetStylesWithTargetType (in System.Windows.Controls.DataVisualization) to retrieve an IEnumerator of styles appropriate for our data point type. 

newValue.GetStylesWithTargetType(typeof(StockDataPoint), true))

The "true" indicates that we are willing to accept styles with a target type that is an ancestor of our data point's type.  Due to the fact that all of the styles in the Chart's default style palette target Control - which StockDataPoint inherits from - we can be sure our series will get a style when we insert it into a Chart.

Adding a Legend Item

Now that we've acquired a style we can use for our data points the time is right to insert a legend item into the Legend.  We'll add a private property to store an instance of the LegendItem class and initialize it in the constructor.  In order to ensure that it is inserted into the Legend we'll add it to the series LegendItems collection (inherited from base class Series). UI elements inserted into the legend items collection of a series are automatically inserted into the legend by the series host.

public class StockSeries : Series { // snip... private LegendItem LegendItem { get; set; } public StockSeries() { this.DefaultStyleKey = typeof(StockSeries); this.LegendItem = new LegendItem(); this.LegendItems.Add(LegendItem); } }

A well-behaved series ensures the following:

  • If it does not have a title its legend item should display the series index
  • If it has a title the legend item should display it
  • Its legend item should have a visual appearance similar to its data points

Displaying the Series Index

If the series does not have a title it should display its series index in the LegendItem. Therefore we must determine what the index of our series is.  We can try and figure out our index by counting the series in our series host collection, but this approach is complicated because we would also have to monitor the series collection of our series host for any changes.

Thankfully we can let the series host do the work for us by implementing IRequireGlobalSeriesIndex.  This is our way of signaling to the series host that this series uses an index and needs to be informed when that index changes. In addition to implementing this interface we'll also add a property to store the global series index value.

public class StockSeries : Series, IRequireGlobalSeriesIndex { private int GlobalSeriesIndex { get; set; } private LegendItem LegendItem { get; set; } public void GlobalSeriesIndexChanged(int globalIndex) { GlobalSeriesIndex = globalIndex; UpdateLegendItem(); } private void UpdateLegendItem() { if (GlobalSeriesIndex != -1) { LegendItem.Content = string.Format("Series {0}", GlobalSeriesIndex + 1); } } // snip... }

Now if we add our series to a chart we should be able to see our legend item!

blogimage15

Displaying the Series Title in the Legend Item

If a series title is set it's good practice to display it in the legend item instead of the index.  We could set the content of our legend item to the series Title property when we create the legend item, but we also need to update our legend item if the title changes.  We can listen for changes to the title property by overriding the protected OnTitleChanged method.  Let's also modify our private UpdateLegendItem method to check if the Title property is set before resorting to using the series index.

public class StockSeries : Series, IRequireGlobalSeriesIndex { private void UpdateLegendItem() { if (Title != null) { LegendItem.Content = this.Title; } else if (GlobalSeriesIndex != -1) { LegendItem.Content = string.Format("Series {0}", GlobalSeriesIndex+1); } } protected override void OnTitleChanged(object oldValue, object newValue) { UpdateLegendItem(); base.OnTitleChanged(oldValue, newValue); } // snip... }

Now if we specify a custom series title we can see it in the Legend!

<charting:Chart> <local:StockSeries Title="My First Series" /> </charting:Chart>

my first series

Styling the Legend Item

Ideally we'd like our legend item to be the same color as our data points.  We can accomplish this by creating an instance of StockSeriesDataPoint, applying the data point style we retrieved from the series host, and setting the data point to be the data context of our legend item.  The best place to do this is in our AcquireDataPointStyle method.

private void AcquireDataPointStyle() { if (SeriesHost != null) { using (IEnumerator<Style> styleEnumerator = SeriesHost.GetStylesWithTargetType(typeof(StockDataPoint), true)) { if (styleEnumerator.MoveNext()) { DataPointStyle = styleEnumerator.Current; this.LegendItem.DataContext = new StockDataPoint { Style = DataPointStyle }; } } } }

Now we can see that the legend item has a color.

my first series in color

So how does this work?  The default template for the LegendItem binds to the background color and border brush properties of its DataContext.  This approach means that we can expose a LegendItemStyle property and give designers the ability to replace our legend item's template while still retaining certain aspects of the data point style (such as the color).  I'll leave that as an exercise for the reader.

Binding Data Points to a Data Source

We'd like to be able to bind our series directly to objects in our data source.  Let's add string properties for the DatePath, HighPath, LowPath, and ClosePath to our series.  We'll store the path's in binding objects which we'll use to bind the properties in our data points to the properties in our data source objects.  We expose string properties for our paths instead of bindings because strings are easier to work with in Blend.

private Binding dateBinding = new Binding(); public string DateBinding { get { return dateBinding.Path.Path; } set { dateBinding.Path = new PropertyPath(value); } } private Binding lowBinding = new Binding(); public string LowPath { get { return lowBinding.Path.Path; } set { lowBinding.Path = new PropertyPath(value); } } private Binding highBinding = new Binding(); public string HighPath { get { return highBinding.Path.Path; } set { highBinding.Path = new PropertyPath(value); } } private Binding closeBinding = new Binding(); public string ClosePath { get { return closeBinding.Path.Path; } set { closeBinding.Path = new PropertyPath(value); } }

Let's follow the ItemsControl model and add an ItemsSource dependency property of type IEnumerable.  When the ItemsSource property changes we'll create a data point for each object and add the data points to a dictionary using the object as the key.  We'll use a helper method called CreateStockDataPoint to create the data point, apply our data point style, and add the bindings to it.

private StockDataPoint CreateStockDataPoint(object value) { var stockDataPoint = new StockDataPoint { DataContext = value }; stockDataPoint.Style = DataPointStyle; stockDataPoint.SetBinding(StockDataPoint.DateProperty, dateBinding); stockDataPoint.SetBinding(StockDataPoint.HighProperty, highBinding); stockDataPoint.SetBinding(StockDataPoint.LowProperty, lowBinding); stockDataPoint.SetBinding(StockDataPoint.CloseProperty, closeBinding); return stockDataPoint; } private Dictionary<object, StockDataPoint> _dataPoints = new Dictionary<object, StockDataPoint>(); public IEnumerable ItemsSource { get { return GetValue(ItemsSourceProperty) as IEnumerable; } set { SetValue(ItemsSourceProperty, value); } } public static readonly DependencyProperty ItemsSourceProperty = DependencyProperty.Register( "ItemsSource", typeof(IEnumerable), typeof(StockSeries), new PropertyMetadata(null, OnItemsSourcePropertyChanged)); private static void OnItemsSourcePropertyChanged(DependencyObject d, DependencyPropertyChangedEventArgs e) { StockSeries source = (StockSeries)d; IEnumerable oldValue = (IEnumerable)e.OldValue; IEnumerable newValue = (IEnumerable)e.NewValue; source.OnItemsSourcePropertyChanged(oldValue, newValue); } protected virtual void OnItemsSourcePropertyChanged(IEnumerable oldValue, IEnumerable newValue) { Refresh(); } public override void Refresh() { if (ItemsSource != null) { this.PlotArea.Children.Clear(); _dataPoints = ItemsSource .Cast<object>() .Select(obj => CreateStockDataPoint(obj)) .ToDictionary(dataPoint => dataPoint.DataContext); foreach (StockDataPoint dataPoint in _dataPoints.Values) { this.PlotArea.Children.Add(dataPoint); } } }

That's all it takes to create our data points and bind them to an underlying data source!

Creating Some Sample Data To Plot

We'll need some sample data if we want to see our series in action.  First we'll need a class to hold our sample data.

public class HighLowClose { public DateTime Date { get; set; } public double High { get; set; } public double Low { get; set; } public double Close { get; set; } }

That was easy.  Thanks automatic properties!  Now let's create a set of data and set it to the ItemsSource property of our series.

var date = new DateTime(2008, 1, 1); StockSeries stockSeries = chart.Series[0] as StockSeries; stockSeries.DatePath = "Date"; stockSeries.HighPath = "High"; stockSeries.LowPath = "Low"; stockSeries.ClosePath = "Close"; stockSeries.ItemsSource = new[] { new HighLowClose { Date = date, High = 23.0, Low = 18.0, Close = 22.0 }, new HighLowClose { Date = date.AddDays(1), High = 26.0, Low = 22.0, Close = 22.0 }, new HighLowClose { Date = date.AddDays(2), High = 33.0, Low = 30.0, Close = 32.0 }, new HighLowClose { Date = date.AddDays(3), High = 44.0, Low = 42.0, Close = 43.0 }, new HighLowClose { Date = date.AddDays(4), High = 37.0, Low = 35.0, Close = 36.0 }, new HighLowClose { Date = date.AddDays(5), High = 49.0, Low = 43.0, Close = 48.0 }, };

Now we're ready to starting plotting our data points.

Acquiring Axes

Listening for Changes

To plot our data points we'll need axes, but first we need to ensure that our series can receive messages from them.  The series needs to be able to listen for changes in the axes such as a change in the range or size.  This way it can respond to these changes by updating the positions of its data points accordingly.  A series can listen for axis changes by implementing the IAxisListener interface.

[TemplatePart(Name = "PlotArea", Type = typeof(Canvas))] public class StockSeries : Series, IAxisListener, IRequireGlobalSeriesIndex { // snip... public void AxisInvalidated(IAxis axis) { } }

The AxisInvalidated method is called by an axis when it changes.  Eventually we will add some code to update our data points to this method.  For the time being we'll leave it empty though.

Acquiring Axes

Now that we can listen for changes in an axis we want to acquire axes that we can use.  Where do get them from though? 

A well-behaved series does the following when it is added to a series host:

  • Looks for suitable axes in its series host's axes collection
  • If no axes are found it creates the axes it needs and adds them to its series host's collection of axes
  • Adds itself to each axes' collection of registered listeners

A well-behaved series does the following when it is removed from a series host:

  • Removes itself from each axes' collection of registered listeners

If we follow the steps above our stock series can share the same axes with other series.  We will also ensure that developers won't have to explicitly add appropriate axes to the chart's axes collection before they can use our series. 

There are three axes available in Silverlight Charts:

  • LinearAxis
  • DateTimeAxis
  • CategoryAxis

One approach would be too look for a horizontal DateTimeAxis and a vertical LinearAxis in the series host's axes collection when the SeriesHost property changes.  While this approach would work it would be sub-optimal.  In addition to allowing custom series, Silverlight Charts also allows custom axes.  We'd like our series to be able to use any axes added in the future (ex. LogarithmicAxis) as well as axes added by third-parties.  Let's take a look at the axis hierarchy.

blogimage10

You might be feeling a little overwhelmed but don't worry :-).  We're primarily interested in the interfaces and I'll explain those one by one. 

Let's take a look at the axes acquisition code in our StockSeries class.

private IAxis IndependentAxis { get; set; } private IRangeAxis DependentAxis { get; set; } protected override void OnSeriesHostPropertyChanged(ISeriesHost oldValue, ISeriesHost newValue) { if (newValue != null) { this.IndependentAxis = newValue.Axes .OfType<IAxis>() .Where(axis => axis.CanPlot(DateTime.Now) && axis.Orientation == AxisOrientation.X) .FirstOrDefault(); if (this.IndependentAxis == null) { IndependentAxis = new DateTimeAxis { Orientation = AxisOrientation.X }; newValue.Axes.Add(IndependentAxis); } this.IndependentAxis.RegisteredListeners.Add(this); this.DependentAxis = newValue.Axes .OfType<IRangeAxis>() .Where(rangeAxis => rangeAxis.CanPlot(0.0) && rangeAxis.Orientation == AxisOrientation.Y) .FirstOrDefault(); if (this.DependentAxis == null) { DependentAxis = new LinearAxis { Orientation = AxisOrientation.Y }; newValue.Axes.Add(DependentAxis); } this.DependentAxis.RegisteredListeners.Add(this); } else { if (this.IndependentAxis != null) { this.IndependentAxis.RegisteredListeners.Remove(this); } if (this.DependentAxis != null) { this.DependentAxis.RegisteredListeners.Remove(this); } } AcquireDataPointStyle(); base.OnSeriesHostPropertyChanged(oldValue, newValue); }

One immediate side-effect of this general approach is that we can use a CategoryAxis on the horizontal in addition to a DateTimeAxis because category axes can plot dates as well.

When we acquire an axis we add ourselves to its registered listeners collection.  When the axis changes it will call the AxisInvalidated method on all its registered and we'll get the opportunity to update our data points.  Now we're ready for the main event...

Plotting the Data Points

When the "Refresh" method of the base Series class is called our series is expected to retrieve data from its data source and plot its data points.  Let's create an "UpdateDataPoints" method which will plot a sequence of data points and invoke it in the "Refresh" method. 

public override void Refresh() { if (IndependentAxis != null && DependentAxis != null && PlotArea != null && ItemsSource != null) { this.PlotArea.Children.Clear(); _dataPoints = ItemsSource .Cast<object>() .Select(obj => CreateStockDataPoint(obj)) .ToDictionary(dataPoint => dataPoint.DataContext); foreach (StockDataPoint dataPoint in _dataPoints.Values) { this.PlotArea.Children.Add(dataPoint); } this.Dispatcher.BeginInvoke(() => UpdateDataPoints(_dataPoints.Values)); } }

Notice that instead of updating the data points synchronously we use BeginInvoke.  This will delay the process until after a layout pass has occurred.  This gives Silverlight/WPF the opportunity to apply the template to our data point controls.  This is important as we will need to know the final width of the data points in order to center them along the X axis.  Now let's write the methods that do the important work of positioning the data points. 

private void UpdateDataPoints(IEnumerable<StockDataPoint> dataPoints) { foreach (var dataPoint in dataPoints) { UpdateDataPoint(dataPoint); } } private void UpdateDataPoint(StockDataPoint dataPoint) { // GetPlotAreaCoordinate returns a nullable value because the value // may or may not be present on the axis. var dateCoordinateUnitValue = IndependentAxis.GetPlotAreaCoordinate(dataPoint.Date); if (dateCoordinateUnitValue != null && dateCoordinateUnitValue.Value.Unit == Unit.Pixels) { var nullableHighCoordinateUnitValue = DependentAxis.GetPlotAreaCoordinate(dataPoint.High); var nullableLowCoordinateUnitValue = DependentAxis.GetPlotAreaCoordinate(dataPoint.Low); var nullableCloseCoordinateUnitValue = DependentAxis.GetPlotAreaCoordinate(dataPoint.Close); if (nullableHighCoordinateUnitValue != null && nullableHighCoordinateUnitValue.Value.Unit == Unit.Pixels && nullableLowCoordinateUnitValue != null && nullableLowCoordinateUnitValue.Value.Unit == Unit.Pixels && nullableCloseCoordinateUnitValue != null && nullableCloseCoordinateUnitValue.Value.Unit == Unit.Pixels) { // Subtract all Y coordinates from the height of the plot // area canvas to invert the Y axis. The ensures that // larger values appear higher than smaller ones. var highPixelValue = PlotArea.ActualHeight - nullableHighCoordinateUnitValue.Value.Value; var lowPixelValue = PlotArea.ActualHeight - nullableLowCoordinateUnitValue.Value.Value; var closePixelValue = PlotArea.ActualHeight - nullableCloseCoordinateUnitValue.Value.Value; var dataPointHeight = lowPixelValue - highPixelValue; var closeCoordinate = closePixelValue - highPixelValue; dataPoint.CloseCoordinate = closeCoordinate; dataPoint.Height = dataPointHeight; // center our stock data point on the X point Canvas.SetLeft(dataPoint, dateCoordinateUnitValue.Value.Value - (dataPoint.ActualWidth / 2.0)); Canvas.SetTop(dataPoint, highPixelValue); } }

The GetPlotAreaCoordinate method of the IAxis type is important to understand.  Rather than a double this method returns a nullable UnitValue object.  This value is nullable because a given value may not exist on an axis.  For example negative values cannot exist on a logarithmic axis.  Also certain values may or may not be present on a category axis.

The UnitValue object is composed of a double Value property and an enum Unit property value which can be either Pixels or Degrees.  Although there aren't current any axes in Silverlight Charts that return Degree values this may change in the future to support radial axes.  For the time being our series will only render pixel values.

Now we're ready to implement our AxisInvalidated method.  All we need to do is call UpdateDataPoints!

public void AxisInvalidated(IAxis axis) { //Refresh(); UpdateDataPoints(_dataPoints.Values); }

Given the following XAML...

<charting:Chart x:Name="chart"> <charting:Chart.Axes> <charting:DateTimeAxis Orientation="X" /> <charting:LinearAxis Orientation="Y" /> </charting:Chart.Axes> <local:StockSeries Title="My First Series" /> </charting:Chart>

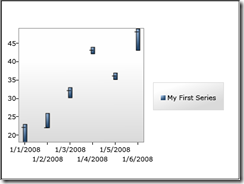
...we should be able to see our series.  Drumroll please...

emptyseries

Oops.  So what went wrong?  Why didn't our data points get plotted?

In fact our data points were plotted, it's just that they are outside of the visible range of the Y axis.  Notice that the range on the Y axis is 0 to 1.  Turns out that just as an axis needs to communicate with a series when it changes, a series must also communicate information to its axes.  In this case the series must communicate its data range to the axes so that the axes can select an appropriate range.

Helping the Axis Pick a Better Range

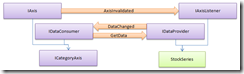
In order to get the axis to choose a range that is appropriate for our data we'll implement IRangeProvider.  Let's take a look at how an IRangeProvider interacts with an IRangeAxis.

rangeaxis

We implement the IRangeProvider.GetRange method so the axis can query the series to determine an appropriate range to display.  When a range consumer requests a range it passes itself to the GetRange method.  This allows us to determine which axis is requesting the range, the dependent axis or the independent axis.

public class StockSeries : Series, IRequireGlobalSeriesIndex, IAxisListener, IRangeProvider { //snip... public Range<IComparable> GetRange(IRangeConsumer rangeConsumer) { if (_dataPoints.Any()) { if (rangeConsumer == IndependentAxis) { DateTime minimum = _dataPoints.Values.Select(dataPoint => dataPoint.Date).Min(); DateTime maximum = _dataPoints.Values.Select(dataPoint => dataPoint.Date).Max(); return new Range<IComparable>(minimum, maximum); } else if (rangeConsumer == DependentAxis) { double minimum = _dataPoints.Values.Select(dataPoint => dataPoint.Low).Min(); double maximum = _dataPoints.Values.Select(dataPoint => dataPoint.High).Max(); return new Range<IComparable>(minimum, maximum); } } return new Range<IComparable>(); } }

Now the range axis can determine the best range to use to display our series data.  That's only half of the equation though.  The series also needs to be able to inform the axis that its range has changed.  The best time to do this is in the Refresh method after we load our data.

public override void Refresh() { if (IndependentAxis != null && DependentAxis != null && PlotArea != null && ItemsSource != null) { // snip... this.Dispatcher.BeginInvoke( () => { UpdateDataPoints(_dataPoints.Values); { { IRangeConsumer rangeConsumer = IndependentAxis as IRangeConsumer; if (rangeConsumer != null) { rangeConsumer.RangeChanged(this, GetRange(rangeConsumer)); } } { IRangeConsumer rangeConsumer = DependentAxis as IRangeConsumer; if (rangeConsumer != null) { rangeConsumer.RangeChanged(this, GetRange(rangeConsumer)); } } } }); } }

Now we should be able to see our series in action...

seriesinaction

Hmmm, looks okay.  Our data points have got a nice looking gradient and they've been plotted properly. 

The problem is that our far left and far right data points stretch outside of the chart.  The axis is doing its job and picking a range that encompasses all our data.  The problem is that our data points have a display width in addition to a data value. 

What we'd really like is for the axis to pick a range large enough so that both our data and our visual objects will fit inside of the series.  So how do we do that?

Making Room With ValueMargins

In order to help an axis balance display concerns and data concerns Silverlight Charts provides a ValueMargin object.  A value margin is a data value with a high and low margin value in pixels.  When an axis is provided with value margins in addition to a range it will try and find a range large enough such that a series data and its graphical objects can be displayed inside of the Chart.

The IValueMarginProvider and IValueMarginConsumer interfaces work in a way very similar to the IRangeProvider and IRangeConsumer interfaces:

valuemargins

Let's implement IValueMarginProvider.

public class StockSeries : Series, IRequireGlobalSeriesIndex, IAxisListener, IRangeProvider, IValueMarginProvider { //snip... public IEnumerable<ValueMargin> GetValueMargins(IValueMarginConsumer consumer) { // We only need to worry about value margins on the X axis. // On the Y axis the top and bottom of the data point always // correspond to the value location on the axis. if (consumer == IndependentAxis && consumer is IRangeAxis) { if (_dataPoints.Values.Any()) { // We return the width of only minimum and maximum data // points. The other information is unnecessary. StockDataPoint minimumStockDataPoint = EnumerableFunctions.Min(_dataPoints.Values, dataPoint => dataPoint.Date); StockDataPoint maximumStockDataPoint = EnumerableFunctions.Max(_dataPoints.Values, dataPoint => dataPoint.Date); var halfWidth = minimumStockDataPoint.Width / 2.0; return new[] { new ValueMargin(minimumStockDataPoint.Date, halfWidth, halfWidth), new ValueMargin(maximumStockDataPoint.Date, halfWidth, halfWidth), }; } } return new ValueMargin[] { }; } }

Notice that we're only worried about returning value margins to the independent (X) axis.  That's because the top and bottom of a data point on a stock chart always line up with a value on the axis (lest they be misleading).

To make life easier I've written some helper functions: Min and Max.  These functions work by accepting a function that they apply to each data point.  The function returns a value which is used to compare the data points.  The data point with the largest or smallest computed value is returned.

That wasn't too tough.  Now let's take a look at our series...

finished

Success!  There's only one more thing to do...

Supporting a Category Axis

Remember that we accept any axis on the horizontal, not just a DateTimeAxis.  This means that we can use an instance of the CategoryAxis class for our independent axis.  A category axis is similar to a range axis in that it needs to know what values to include.  As a result our series must inform the category axis which discrete values it intends to plot.  Predictably this is accomplished using the familiar Provider/Consumer model.

dataconsumer

Let's implement IDataProvider...

public class StockSeries : Series, IRequireGlobalSeriesIndex, IAxisListener, IRangeProvider, IValueMarginProvider, IDataProvider { public IEnumerable<object> GetData(IDataConsumer axis) { if (axis == IndependentAxis) { return _dataPoints.Values.Select(dataPoint => dataPoint.Date).Cast<object>(); } else if (axis == DependentAxis) { return _dataPoints.Values .SelectMany(dataPoint => new[] { dataPoint.Close, dataPoint.High, dataPoint.Low }).Cast<object>(); } return new object[] { }; } //snip... }

Just as we must inform the range axes we're using that the range has changed after loading new data we must also inform any axes that implement IDataConsumer (such as axes that implement ICategoryAxis) that our data has changed.  Let's revisit our Refresh method one last time.

public override void Refresh() { // snip... this.Dispatcher.BeginInvoke( () => { UpdateDataPoints(_dataPoints.Values); { { IRangeConsumer rangeConsumer = IndependentAxis as IRangeConsumer; if (rangeConsumer != null) { rangeConsumer.RangeChanged(this, GetRange(rangeConsumer)); } IDataConsumer dataConsumer = IndependentAxis as IDataConsumer; if (dataConsumer != null) { dataConsumer.DataChanged(this, GetData(dataConsumer)); } } { IRangeConsumer rangeConsumer = DependentAxis as IRangeConsumer; if (rangeConsumer != null) { rangeConsumer.RangeChanged(this, GetRange(rangeConsumer)); } IDataConsumer dataConsumer = DependentAxis as IDataConsumer; if (dataConsumer != null) { dataConsumer.DataChanged(this, GetData(dataConsumer)); } } } }); }

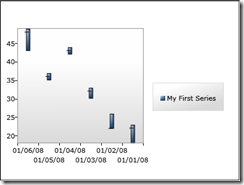
Now let's try and use a category axis with our stock series.  To make things interesting let's reverse the order of the dates on the axis (something a DateTimeAxis doesn't support).

<charting:Chart x:Name="chart"> <charting:Chart.Axes> <charting:CategoryAxis Orientation="X" SortOrder="Descending"> <charting:CategoryAxis.AxisLabelStyle> <Style TargetType="charting:AxisLabel"> <Setter Property="StringFormat" Value="{}{0:MM/dd/yy}" /> </Style> </charting:CategoryAxis.AxisLabelStyle> </charting:CategoryAxis> <charting:LinearAxis Orientation="Y" /> </charting:Chart.Axes> <local:StockSeries Title="My First Series" /> </charting:Chart>

Now let's take a look at our Series...

categoryaxis

A New Series For Silverlight Charts

As you can see Silverlight Charts has a very rich set of interfaces you can use to smoothly integrate custom series and axes.  With roughly 450 lines of code we just added the last series missing from Excel to Silverlight Charts.  The ball's in your court.  We're eager to see what the community comes up with.

Next Time: Making our Stock Series dynamic!

About Me

My photo
I'm a software developer who started programming at age 16 and never saw any reason to stop. I'm working on the Presentation Platform Controls team at Microsoft. My primary interests are functional programming, and Rich Internet Applications.